Breaking Ground - Pouring The Pier
In the beginning...digging and pouring the pier

Found a local handy man who knows concrete. John was awesome to work with...he wisely showed up with a power auger to get through the thick clay. He thought my plan was a bit out there, which it was...but he still managed to deliver
Aligning the pier

Aligning the pier to the north was crucial...the level in the background was checked numerous times...
Double Checking Alignment

To be absolutely certain that we had the alignment right, we installed the pier, as the adapter plate could only be installed one way (without modifications), and getting the height to match the floor was a tad tricky, but we got it pretty close
Pad poured

After pouring the pier a week before, I arrived home one night to find that the framing for the pad has been installed, and it was poured the next day. Measures 9' X 18'
Construction Begins - Floor
Flooring, with under-floor tract for power and control cables
Flooring, with under-floor tract for power and control cables
Flooring, with under-floor tract for power and control cables
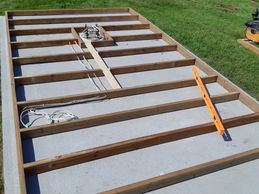
Installed an under-floor tract for USB and power cables to the mount
More floor base
Flooring, with under-floor tract for power and control cables
Flooring, with under-floor tract for power and control cables

Secured the floor frame to the concrete pad...severe winds out here at times, and would rather not find the obsy knocked off it's pad after a storm
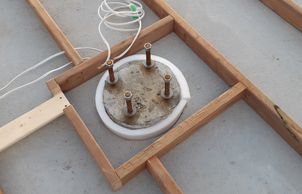
The pier base/ opening
Flooring, with under-floor tract for power and control cables
Under floor cable tract
Ran 120VAC and wire for future 12VDC
Under floor cable tract
Under floor cable tract
Under floor cable tract
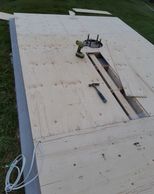
Left this easily accessible for future upgrades and/or cable replacement
Floor/ base
Under floor cable tract
Pier opening
All pressure-treated base
Pier opening
Under floor cable tract
Pier opening
Sealed and mechanically isolated floor (from the pier, 12" diameter X 4' deep concrete with 4 lengths of rebar)
Walls
Rear wall
Started with the easy wall first
Front wall
Held off on building the floor to use the cement pad as a flat work area to build the walls...turned out to be a wise decision
Walls up
Walls up
Walls went up without a hitch...plan your work, and work your plan
Walls
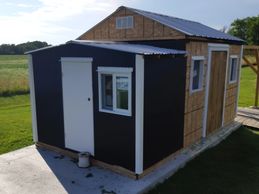
Exterior walls complete
Walls up
Had the pier and scope installed early...OK, couldn't wait to start imaging...but also to check on the wall height, to confirm that it was gonna work
Walls covered
Exterior walls complete
Exterior walls complete
Almost complete OSB on the walls
Exterior walls complete
Exterior walls complete
Exterior walls complete
Ready for roofing
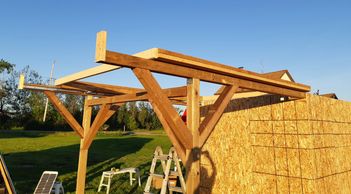
Roof & roll off supports
Roll Off Roof Rails
Warm Room Roof Inside View
Roll Off Roof Rails
It was tricky getting it all square, but nailed it
Warm Room Roof
Warm Room Roof Inside View
Roll Off Roof Rails
Had to design the warm room roof from scratch
Warm Room Roof Inside View
Warm Room Roof Inside View
Warm Room Roof Ready For Panels
Detail of the frame work of the warm room...2" X 3" beams to save headroom
Warm Room Roof Ready For Panels
Warm Room Roof Ready For Panels
Warm Room Roof Ready For Panels
Warm room roof complete, ready for steel roof panels
Steel Roof Installed
Warm Room Roof Ready For Panels
Roll Off Roof Complete
Steel roofing installed
Roll Off Roof Complete
Warm Room Roof Ready For Panels
Roll Off Roof Complete
First check of the roll off roof, rolling off
Siding and weather proofing
Ready for siding
Front wall complete
Ready for siding
Tar paper applied to the insulated warm room
Siding started
Front wall complete
Ready for siding

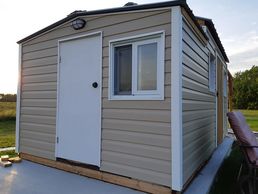
Siding hung on warm room
Front wall complete
Front wall complete
Roll off side in progress
Siding applied to front wall
Roll off side in progress
Roll off side in progress
Roll off side in progress

Siding hung on roll off wall...tricky getting this side right
Brush Seal
Roll off side in progress
Entrance Light
Decided to use overhead door brush seals to try to keep out the elements and bugs
Entrance Light
Roll off side in progress
Entrance Light
Installed a red LED to allow setting up a scope for observing on the deck
Electrical and finishing touches
Trench for wire and communications
Trench for wire and communications
Trench for wire and communications

Ran 14/3 electrical cable and Cat5e to the garage. Wireless works fairly well from the house, but nothing like a hardwired connection. And using an extension cord for power just wasn't cutting it. Once winter hits, the extra power will be nice
Control Room
Trench for wire and communications
Trench for wire and communications
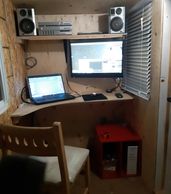
Although I can control everything from inside the house (focus, slewing the mount and camera). having a warm room will be appreciated during set-up and adjustments over the coming winter...cozy little cubby hole
Control room in action
Trench for wire and communications
Red LED exterior lighting
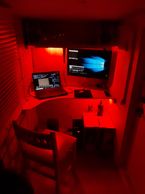
Under-shelf red LED lights installed. Went with 12VDC lighting fixtures for RV use. Double lamp, 1st notch is red, 2nd notch brings up the white LED's. Future intention is to power everything with solar and a 12 VDC deep cycle battery
Red LED exterior lighting
Sunset over the Blue Marble Observatory
Red LED exterior lighting
Found a deal on red LED rope lighting just before my first open house/ star party. This was perfect for allowing everyone to see their way around and maintain their dark vision.
Looks kinda cool, too
A place to chill before imaging
Sunset over the Blue Marble Observatory
Sunset over the Blue Marble Observatory
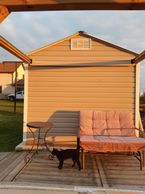
A perfect spot to watch the sunset...or watch the fire...
made use of an old wheelchair ramp that came with the house...
Sunset over the Blue Marble Observatory
Sunset over the Blue Marble Observatory
Sunset over the Blue Marble Observatory
After 6 months of effort, I can sit back and breathe again!
If anyone is considering building (or buying) their own personal observatory, my suggestion is...
what are you waiting for?